Bash Scripting for Beginners in 2026: Automate Your Linux Workflow
Let me paint you a picture.
It’s a Tuesday morning. You sit down at your machine, open the terminal, and immediately start typing the same commands you typed last Tuesday. sudo apt update. sudo apt upgrade. Open another tab. flatpak update. Another tab. snap refresh. Check if your project repos have any upstream changes. Pull them one by one. Check the logs for that one annoying error that keeps showing up. Count how many files are in that folder you’ve been meaning to clean. Check how much disk space they’re taking up.
By the time you’ve done all of that, twenty minutes have passed and you haven’t written a single line of actual work.
That was me, about two months after I switched to Linux and started living in the terminal. I loved the control. I hated the repetition. And then someone pointed out the obvious thing I’d been ignoring the whole time: you’re on Linux. Just write a script.
So I did. And now what used to take twenty minutes of tab-switching and muscle memory takes about four seconds and a single command. My Tuesday mornings (and all other mornings for that matter) are a lot more productive. My problem-solving instincts are sharper. And honestly, writing scripts has become one of my favorite parts of working on Linux.
Well. Now that I’m done yapping, let’s get into it.
Prerequisites - Read This First
This post is a direct follow-up to How to Switch OS from Windows to Linux in 2026. If you’ve already made the switch and you’re comfortable moving around in the terminal, you’re in the right place.
Do you need Linux to follow along? Technically, no - Bash also runs on macOS (though macOS ships with Zsh as default now) and on Windows via WSL (Windows Subsystem for Linux). But if you’re on WSL, be aware: you’ll run into complications. File system permissions work differently, paths behave unexpectedly, and some scripts that run perfectly on native Linux will misbehave on WSL without extra configuration. It’s workable, but it’s friction you don’t need when you’re just starting out.
Our recommendation: if you’re serious about learning scripting, be on native Linux. If you haven’t made the switch yet, the Linux post above encompasses all the wonders you can do with Linux and also walks you through the whole setup process. It’ll make everything in this post significantly smoother.
What Even Is a Shell?
Before we talk about Bash specifically, let’s be clear about what a shell is.
A shell is a program that takes the commands you type in your terminal and passes them to the operating system to execute. Think of it like a translator - you speak in human-readable commands, the shell translates them into something the OS understands, and the OS does the work. The terminal window itself is just the window you type in. The shell is the engine behind it.
There are several shells available on Linux. They all do roughly the same job but with different syntax, features, and philosophies.
Bash vs Zsh vs Fish
| Bash | Zsh | Fish | |
|---|---|---|---|
| Full name | Bourne Again Shell | Z Shell | Friendly Interactive Shell |
| Default on | Most Linux distros | macOS (since Catalina) | Nothing by default |
| Scripting | ⭐⭐⭐⭐⭐ Industry standard | ⭐⭐⭐⭐ Mostly compatible with Bash | ⭐⭐ Different syntax, not POSIX |
| Interactivity | ⭐⭐⭐ Solid | ⭐⭐⭐⭐ Great autocomplete | ⭐⭐⭐⭐⭐ Best out of the box |
| Learning curve | Low | Low-Medium | Medium (different syntax) |
| Best for | Scripting, compatibility | Daily use + scripting | Beginners who want a nice shell |
For scripting, Bash is the right choice. It’s installed on virtually every Linux system by default, it’s what most tutorials, documentation, and production scripts are written in, and it’s what we’ll be using throughout this post. Zsh is largely compatible with Bash scripts, so if you followed the Linux post and switched to Zsh for your daily shell, your Bash scripts will still run fine.
Setting Up Your Tools
Before we write a single line of script, let’s make sure you have the right tools in place.
VS Code
You already have this from the programming environment post. VS Code has excellent Bash support - syntax highlighting, integrated terminal, and extension support that makes writing scripts much more pleasant than doing it in a plain text editor.
Install the following extensions to get the most out of it for Bash:
- Bash IDE (
mads-hartmann.bash-ide-vscode) - adds autocompletion, go-to-definition, and hover documentation for Bash - ShellCheck (
timonwong.shellcheck) - this one is essential, see below
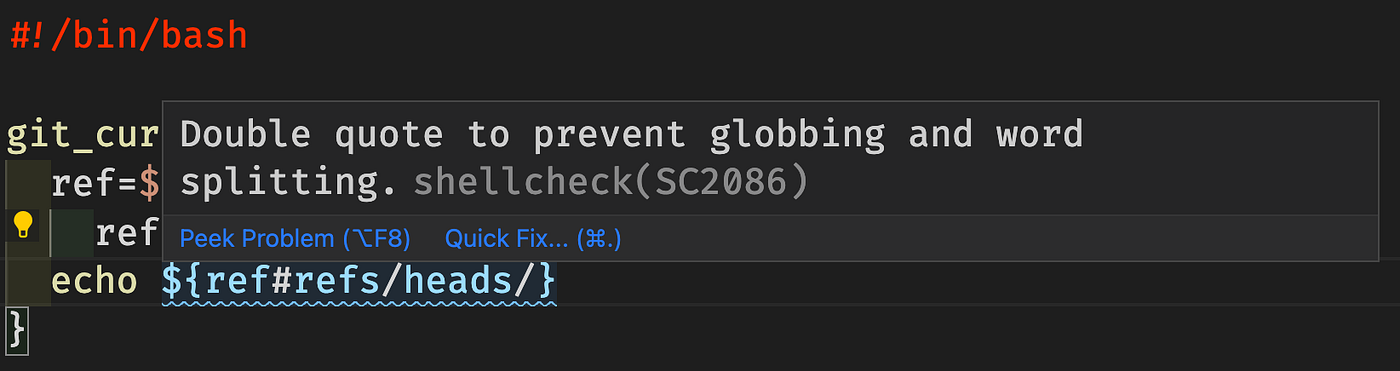
ShellCheck
ShellCheck is a static analysis tool for shell scripts. Think of it like a spell checker, but for your Bash code - it spots mistakes, warns you about bad practices, and explains why something is wrong before you ever run the script.
Install it on Ubuntu:
sudo apt install shellcheck -y
Once installed, the VS Code ShellCheck extension automatically runs it in the background as you write. You’ll see yellow and red underlines on problematic lines, with explanations on hover. It catches things like:
- Unquoted variables that could break with spaces in filenames
- Commands that might fail silently
- Syntax errors before you run anything
- Deprecated or non-portable syntax
Make a habit of writing scripts in VS Code with ShellCheck active. It’ll teach you good habits faster than any tutorial will.
Your First Script
Let’s write something. Open your terminal and create a new file:
mkdir ~/scripts
cd ~/scripts
touch hello.sh
code hello.sh
Breakdown:
- This creates a
scriptsfolder in your home directory - Then moves into it
- Then creates a new file called
hello.sh - And finally opens it in VS Code.
The .sh extension isn’t required as Bash doesn’t care about file extensions - but it’s a convention that tells both humans and tools what the file contains.
The Shebang Line
The very first line of every Bash script should be this:
#!/bin/bash
This is called the shebang (or hashbang). It tells the operating system which interpreter to use when running the file. Without it, the OS doesn’t know what kind of script it’s looking at and may use the wrong interpreter or flat-out refuse to run it at all.
Think of it like the cover of a book telling you what language it’s written in before you open it.
Add this to your hello.sh:
#!/bin/bash

echo "Hello, $(whoami). Welcome to Bash scripting."
echo "Today is $(date +%A), $(date +%d\ %B\ %Y)."
Breakdown:
- The
echocommand prints text to the terminal. $(...)is command substitution (i.e. it runs a command and inserts its output directly into the string).whoamireturns your username.datereturns the current date formatted however you specify.
Making It Executable
Save the file. Now try running it:
bash hello.sh
It works. But the goal is to run scripts like this:
./hello.sh
Try that and you’ll get:
bash: ./hello.sh: Permission denied
This is one of the most common first-week moments of confusion on Linux. The file exists. You can see it. But the OS won’t run it directly because it doesn’t have execute permission.
On Linux, every file has three permission types - read (r), write (w), and execute (x) - across three groups: the owner, the group, and everyone else. A new file defaults to readable and writable, but not executable. You have to explicitly grant that.
Fix it with:
chmod +x hello.sh
chmod changes file permissions. +x adds execute permission. Now run it:
./hello.sh

The Building Blocks
We’re going to learn each concept individually and use them to progressively build a real script: a custom up function that lets you move up multiple directory levels in one command instead of typing cd ../../.. like an animal.
By the end of this section you’ll have a working, useful script and you’ll understand every line of it … hopefully.
Variables
Variables store values you want to reuse. In Bash, you define them like this:
name="Ahmad"
number=5
No spaces around the = sign - that’s a common mistake. Spaces will break it.
To use a variable, prefix it with $:
echo "Hello, $name"
echo "You want to go up $number levels"
For safety, always wrap variable references in double quotes:
Example:
echo "Hello, $name"        # correct
echo "Hello, " $name       # works but breaks if name has spaces
For our up script, we’ll need a variable to store how many levels the user wants to move up:
#!/bin/bash

levels=$1
$1 is a positional parameter as it holds the first argument the user passes to the script. For instance, if the user runs ./up.sh 3, then $1 is 3 and levels becomes 3. We’ll come back to this.
User Input
Sometimes you want a script to ask the user for something rather than getting it from an argument. Use read:
echo "What's your name?"
read username
echo "Hello, $username"
For our up script, we’ll use positional parameters instead of read because it’s cleaner for a function you call frequently. But read is essential for interactive scripts like setup wizards.
Conditionals
Conditionals let your script make decisions. The basic structure:
if [ condition ]; then
    # do something
elif [ other condition ]; then
    # do something else
else
    # fallback
fi
Common conditions:
[ -z "$var" ]        # true if variable is empty
[ -n "$var" ]        # true if variable is NOT empty
[ "$a" -eq "$b" ]    # true if numbers are equal
[ "$a" -gt "$b" ]    # true if a is greater than b
[ -f "$file" ]       # true if file exists
[ -d "$dir" ]        # true if directory exists
For our up script, we need to check two things: did the user actually provide a number, and is it a valid positive number?
#!/bin/bash

levels=$1

if [ -z "$levels" ]; then
    echo "Usage: up <number>"
    echo "Example: up 3"
    exit 1
fi

if ! [[ "$levels" =~ ^[0-9]+$ ]]; then
    echo "Error: '$levels' is not a valid number."
    exit 1
fi
exit 1stops the script and signals that something went wrong, andexit 0means success. This is basic error handling and it ensures your scripts communicate clearly instead of doing something unexpected.
The =~ operator checks if a value matches a pattern. ^[0-9]+$ is a regular expression that means “one or more digits, nothing else”, so it rejects inputs like abc or 2.5.
Loops
Loops repeat a block of code. Two types you’ll use most:
for loop:
for i in 1 2 3 4 5; do
    echo "Number: $i"
done

# Or with a range:
for i in {1..5}; do
    echo "Number: $i"
done
while loop:
count=0
while [ $count -lt 5 ]; do
    echo "Count: $count"
    count=$((count + 1))
done
$((...)) is arithmetic expansion - the only way to do maths in Bash.
For our up script, we need to run cd .. exactly N times. A for loop with a range is perfect:
#!/bin/bash

levels=$1

if [ -z "$levels" ]; then
    echo "Usage: up <number>"
    exit 1
fi

if ! [[ "$levels" =~ ^[0-9]+$ ]]; then
    echo "Error: '$levels' is not a valid number."
    exit 1
fi

for i in $(seq 1 "$levels"); do
    cd ..
done
seq 1 "$levels"generates a sequence from 1 to whatever number the user provided. Soup 3loops three times, runningcd ..each time.
Functions
Functions let you group commands into a reusable block with a name. Here’s the syntax:
greet() {
    local name=$1
    echo "Hello, $name!"
}

greet "Ahmad"
local keeps the variable scoped to the function which makes sure it won’t leak out and interfere with other parts of your script. Good habit to use it whenever you define variables inside functions.
Putting it all together, we have the complete up function:
up() {
    local levels=$1

    if [ -z "$levels" ]; then
        echo "Usage: up <number>"
        return 1
    fi

    if ! [[ "$levels" =~ ^[0-9]+$ ]]; then
        echo "Error: '$levels' is not a valid number."
        return 1
    fi

    for i in $(seq 1 "$levels"); do
        cd ..
    done

    echo "Moved up $levels level(s). Now in: $(pwd)"
}
Notice we use return instead of exit inside a function - that’s because exit would close your entire terminal session … you don’t want that.
Making up Available Everywhere
Right now up only exists in the script file. To use it as a command in any terminal session, add it to your ~/.bashrc (or ~/.zshrc if you’re on Zsh):
code ~/.bashrc
Paste the entire function at the bottom of the file, save it, then reload:
source ~/.bashrc
Now you can type up 3 from anywhere and it works. No ./, no path, no fuss.

Common Bash Commands Cheat Sheet
Keep this handy. These are the commands and patterns you’ll reach for constantly when writing scripts.
Navigation & Files
| Command | What it does |
|---|---|
pwd |
Print current directory path |
ls -la |
List all files including hidden, with details |
cd - |
Go back to previous directory |
mkdir -p path/to/dir |
Create nested directories in one command |
cp -r source dest |
Copy a directory recursively |
mv file dest |
Move or rename a file |
rm -rf dir |
Delete a directory and everything in it (be careful) |
find . -name "*.log" |
Find files matching a pattern |
find . -type f \| wc -l |
Count all files in current directory |
Text & Output
| Command | What it does |
|---|---|
echo "text" |
Print text to terminal |
cat file.txt |
Print file contents in the terminal |
grep "pattern" file |
Search for a pattern in a file |
grep -r "pattern" . |
Search recursively in all files |
grep -n "pattern" file |
Show line numbers with matches |
head -n 20 file |
Show first 20 lines of a file |
tail -n 20 file |
Show last 20 lines of a file |
tail -f file |
Follow a file in real time (great for logs) |
wc -l file |
Count lines in a file |
sort file |
Sort lines alphabetically |
uniq |
Remove duplicate lines (pipe from sort) |
System & Processes
| Command | What it does |
|---|---|
ps aux |
List all running processes |
kill -9 PID |
Force kill a process by ID |
df -h |
Show disk usage in human-readable form |
du -sh dir |
Show size of a specific directory |
free -h |
Show RAM usage |
top / htop |
Live process monitor |
uptime |
How long the system has been running |
Script-Specific
| Syntax | What it does |
|---|---|
$1, $2, $3 |
Positional arguments passed to script |
$@ |
All arguments as separate words |
$# |
Number of arguments passed |
$? |
Exit code of the last command |
$$ |
PID of the current script |
$(command) |
Command substitution — insert output inline |
$((expr)) |
Arithmetic expansion |
> file |
Redirect output to file (overwrites) |
>> file |
Redirect output to file (appends) |
2>&1 |
Redirect stderr to stdout |
command1 \| command2 |
Pipe output of command1 into command2 |
When NOT to Use Bash
Bash is powerful, but it’s not the right tool for everything. Here’s an honest look at where it starts to fall apart:
Use something else when:
-
You need to work with complex data structures: Arrays in Bash are limited and clunky. If you’re dealing with nested data, JSON, or anything that needs a real data structure, reach for Python.
-
Your script is getting long: If your script is approaching 200+ lines, it’s a sign the problem is too complex for Bash. Longer Bash scripts become hard to read, harder to debug, and painful to maintain. Python handles this much more gracefully.
-
You need error handling that’s actually robust: Bash error handling is workable but fragile. Python’s
try/exceptis far more predictable. -
You’re doing heavy text processing:
grep,sed, andawkare great for simple cases, but if you’re parsing structured text, manipulating strings in complex ways, or dealing with encodings, Python’s string handling is miles ahead. -
You need cross-platform compatibility: Bash scripts written on Linux often behave differently on macOS or don’t run at all on Windows. Python runs consistently across all three.
The rule of thumb: if your script is automating system tasks, running commands, managing files, or gluing tools together, then Bash is perfect. If it’s doing logic, data processing, or anything that feels like programming rather than commanding, just use Python.
Take It Home
You’ve learned variables, input, conditionals, loops, and functions. You’ve built a working script from scratch. Now it’s your turn.
Here are two scripts to build on your own. We’re not giving you the full solution - that’ll defeat the whole point. We’ll give you the logic, the variables to think about, and the approach. The rest is yours to handle.
Challenge 1: Dev Setup Automation Script
What it should do: Run this script on a fresh Ubuntu install and have your entire dev environment set up automatically - no manual commands, no tab-switching.
Variables to think about:
- A list of packages to install via
apt - A list of snaps to install via
snap - Your Git username and email
- The path where you want to clone your dotfiles repo
Approach:
- Use a
forloop to iterate over your package lists and install each one - Use conditionals to check if something is already installed before trying to install it again (hint:
command -vchecks if a command exists) - Use
echostatements throughout so the user knows what’s happening at each step - Handle the case where a package fails to install, don’t let one failure stop the whole script
Hint Example: command -v git &> /dev/null returns exit code 0 if Git is installed, 1 if it isn’t. Wrap that in an if statement.
Challenge 2: File Counter
What it should do: Accept a directory path as an argument, then count and display the number of files and folders separately, plus the total disk space they occupy.
Variables to think about:
- The target directory (from
$1) - File count
- Folder count
- Total disk usage
Approach:
- Use
findwith the-type fflag to count files and-type dto count directories - Pipe the results into
wc -lto get the count - Use
du -shto get the total disk size of the directory - Use conditionals to validate that the directory actually exists before doing anything
Hint: find /path -type f | wc -l gives you the file count. find /path -type d | wc -l gives you the directory count but remember it includes the directory itself, so you may want to subtract 1.
🧠 Stuck on one of these?
Break it down into the smallest possible step, write that, test it, then add the next step. Scripts are just commands you already know, arranged in order. If a single command works in your terminal, it'll work in a script.
You can also join the community via the links in the footer and direct your questions there. We will help you out as fellow devs.
There’s Always More to Learn
You now have the fundamentals. But scripting is a deep rabbit hole with a lot more to explore once you’re comfortable with the basics. Here are two areas worth investing in next:
1. Exit Codes and Error Handling
Every command in Linux returns an exit code when it finishes. 0 means success. Anything else means something went wrong. You can check the exit code of the last command with $?.
Proper error handling means your scripts fail loudly and clearly instead of silently continuing when something breaks. Three tools you’ll want to learn:
set -e: makes your script exit immediately if any command fails, instead of continuing blindlyset -u: treats unset variables as errors instead of silently treating them as emptytrap: lets you define cleanup actions that run when the script exits, even if it crashes
These three lines at the top of any serious script will save you hours of debugging:
#!/bin/bash
set -euo pipefail
pipefail makes pipelines like cmd1 | cmd2 fail if any command in the pipe fails, not just the last one.
2. Automating Scripts with Cron
Writing a script is only half the battle - the other half is making it run without you. That’s where cron comes in.
Cron is Linux’s built-in task scheduler. You define a schedule and a command, and cron runs it automatically whether you’re at your desk or not. Isn’t that awesome?!
Open your cron jobs with:
crontab -e
The schedule format is: minute hour day month weekday command
Some examples:
# Run a script every day at 8am
0 8 * * * /home/ahmad/scripts/daily-update.sh

# Run every Monday at 9am
0 9 * * 1 /home/ahmad/scripts/weekly-backup.sh

# Run every 30 minutes
*/30 * * * * /home/ahmad/scripts/check-logs.sh
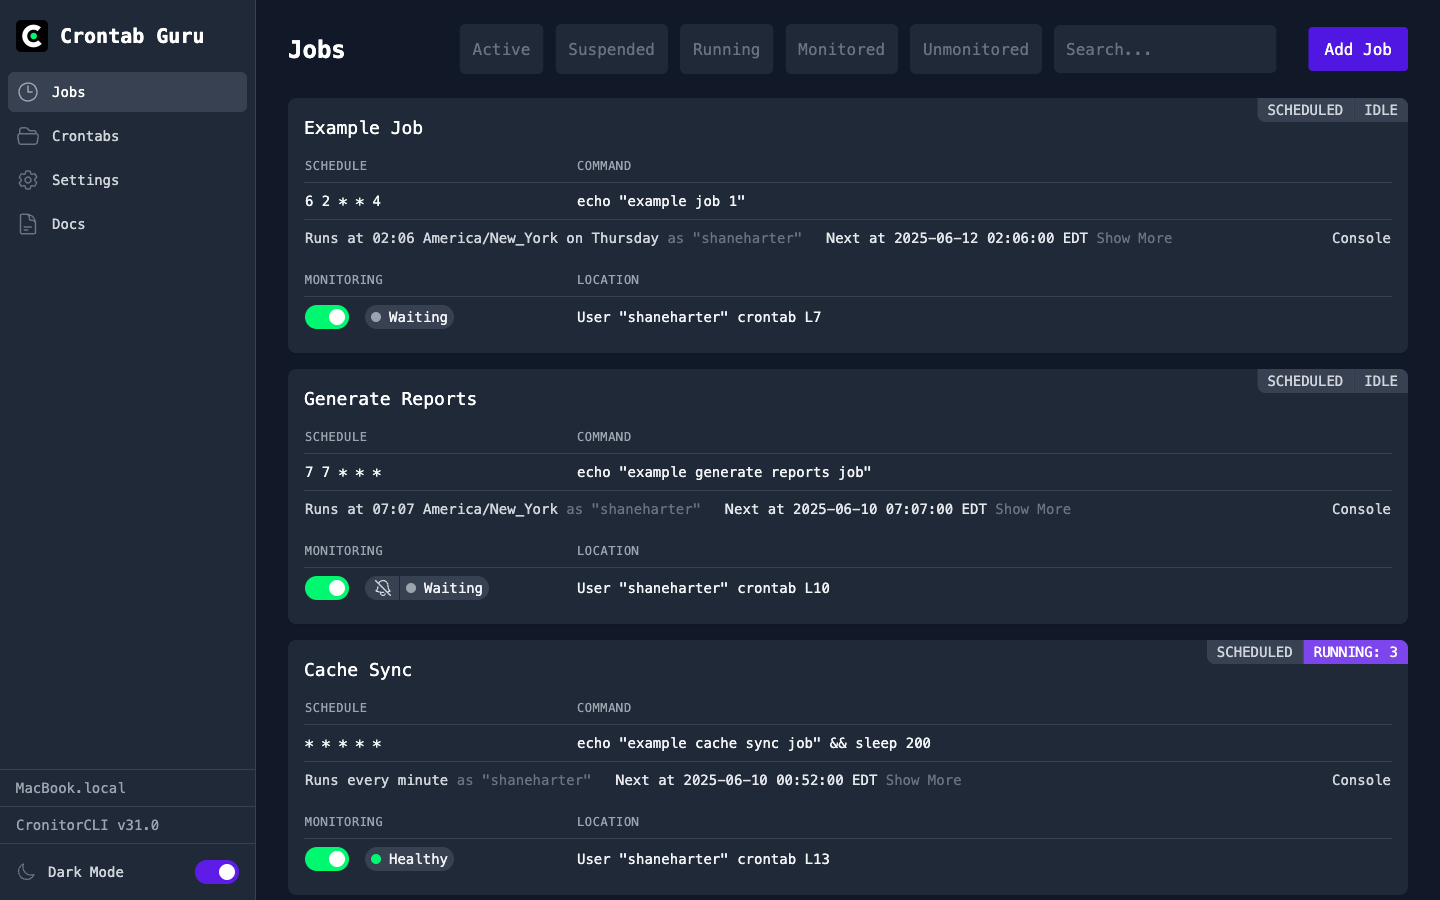
The cron syntax looks intimidating at first. Use crontab.guru - paste any cron expression and it translates it into plain English. Indispensable tool.
Or y’all want me to write on this as well? Let me know in the comments below and I might, MIGHT just oblige.
Keep Going
Here’s the thing about Bash scripting: the hardest part isn’t the syntax. The syntax is learnable in a weekend. The hard part is developing the habit of looking at a repetitive task and immediately asking yourself: can I script this?
That instinct takes time to build. But once it’s there, it changes how you work. You stop tolerating manual repetition. You start solving problems at the root instead of managing symptoms. You build tools specific to your own workflow that no one else has because no one else has your exact setup and your exact problems.
That’s the real value of scripting, not because it saves you twenty minutes on a Tuesday morning - I mean it does that - but because it also trains you to think like someone who builds solutions rather than someone who just uses them.
The up function is running in your shell. The two take-home challenges are waiting. Go build something.
Got questions, or want to share what you built? Drop them in the comments below or reach out to the community - links in the footer.