How to Create Your Own Website in 2026 (Complete Beginner's Guide)
This post is to guide on how to build and set up a website from the very beginning (writing the full code of the website or using a website builder) to the very end (hosting it using a hosting provider or a Virtual Private Server - VPS)
So you want a website. Maybe you have a business idea, a portfolio to show off, a blog that the world desperately needs to read, or perhaps you just want your own corner of the internet that isn’t at the mercy of some algorithm. Whatever the reason - you’re in the right place.
The good news? Building a website in 2026 has never been more accessible. The slightly annoying news? There are about a thousand ways to do it, each with their own trade-offs, and everyone on the internet has a very strong opinion about which one is correct.
In this guide, we’ll cut through the noise. We’ll cover two main paths to building your website - the code-it-yourself route for those who want full control, and the no-code WordPress route for those who want to move fast. We’ll explain every term along the way, compare both options honestly, and walk you through every step from zero to live on the internet.
By the end of this guide, you’ll have a working website. Let’s get into it.
What Even Is a Website?
At its most basic level, a website is just a collection of files sitting on a computer somewhere in the world - a computer that never turns off and is connected to the internet. When someone types your URL into their browser, their computer sends a request to that remote computer, which then sends back your files, and the browser renders them into the page you see on screen.
That’s it. No magic. Just files, computers, and the internet.
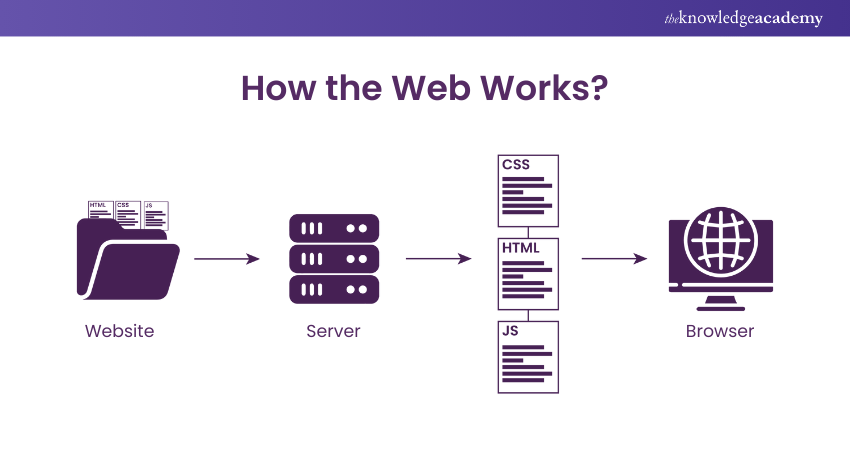
Think of it like a restaurant:
- Your browser is the customer,
- Your domain name is the restaurant’s address,
- The hosting server is the building where the food is actually made and,
- Your website files are the kitchen and the food itself.
When someone visits your site, they’re essentially asking: “Hey, can you send me what’s at this address?” and your server says “Sure, here you go” and serves up your files.
Why You Should Own Your Website
Before we get into the how, let’s quickly cover the why - because if you’re going to invest time into this, it’s worth knowing what you’re getting.
-
You own it: Unlike a social media profile that can be suspended, shadow-banned, or deleted by a platform’s policy change on a Tuesday afternoon, your website belongs to you. The content, the audience, the data - all yours.
-
You control the experience: No ads you didn’t put there, no algorithm deciding who sees your content, no “suggested posts” redirecting your visitors somewhere else.
-
It’s your professional identity: Whether you’re a freelancer, developer, content creator, or business owner, a personal website in 2026 is the equivalent of a business card - except it works 24/7 and doesn’t end up in someone’s trash can.
-
It’s a skill that compounds: Learning how websites work makes you better at everything adjacent to it - marketing, SEO, product thinking, development. It’s one of the highest-leverage skills you can pick up.
Key Terms You Need To Know
Before we pick a path, let’s define the terms that will come up repeatedly. Think of this as your vocabulary cheat sheet.
🌐 Domain Name
A domain name is your website’s address on the internet which is the thing people type to reach you, something like dynamicbytes.blog or yourname.com. Without one, your site exists but nobody can find it easily (it would just be a raw IP address like 192.168.1.1, and nobody’s memorizing that).
You don’t buy a domain forever - you rent it, typically on a yearly basis, from a domain registrar like Namecheap or others.
Cost: Roughly $8–$20/year for a .com, less for alternatives like .blog, .dev, or .xyz.
🖥️ Web Hosting
If your domain name is your address, web hosting is the actual building at that address. It’s a server (a computer) where your website’s files live and get served to visitors.
There are two main types of hosting that matter for beginners:
Managed Hosting
The hosting provider handles the server setup, maintenance, security updates, and configurations for you. You just upload your site and they take care of the rest. Think of it like renting a fully furnished apartment - you move in, they fix the boiler.
Best for: WordPress users, beginners, people who don’t want to think about servers.
Examples:
Cost: ~$3-$15/month.
VPS (Virtual Private Server)
A VPS gives you a slice of a physical server that behaves like your own dedicated machine. You get full root access, you install what you want, configure it how you like, and you’re responsible for maintaining it. Think of it like renting a flat with bare walls — you get to decorate it exactly how you want, but you’re also fixing the boiler yourself.
Best for: Developers, people who want full control, custom/coded websites.
Examples:
Cost: ~$4–$12/month for a starter VPS
⚙️ CMS (Content Management System)
A CMS is a platform that lets you create, manage, and publish website content without writing code for every single page. The most popular one is WordPress.
If your website is a newspaper, a CMS is your editorial team and printing press combined — it handles the layout, the distribution, and all the infrastructure, so you can focus on just writing the articles.
CMS platforms come in different flavors depending on how much control you want and how big your operation is. Here are three good examples, one from each level:
| Level | CMS | Link | Free? | Typical Cost |
|---|---|---|---|---|
| 🟢 Beginner | WordPress.com | wordpress.com | ✅ Limited free plan | From ~$4/month (Personal) to ~$45/month (Business) |
| 🟡 Developer | WordPress.org | wordpress.org | ✅ Software is free | You only pay for hosting (~$3-$15/month) |
| 🔴 Enterprise | HubSpot CMS | HubSpot CMS | ✅ Very limited free tier | From ~$23/month (Starter) up to ~$1,200/month (Enterprise) |
💡 Quick note on WordPress.com vs WordPress.org: They sound the same but they’re not. WordPress.com is a hosted, managed platform - you sign up and go. WordPress.org is the free, open-source software you download and install on your own hosting server. Most serious websites use WordPress.org for the extra control it gives you. We’ll cover both in this guide.
🧱 HTML, CSS, and JavaScript
These are the three core languages of the web. Every website you’ve ever visited is built with some combination of these three.
- HTML (HyperText Markup Language) - The skeleton. It defines the structure of your page: headings, paragraphs, images, links, buttons.
- CSS (Cascading Style Sheets) - The skin and clothes. It controls how everything looks: colors, fonts, spacing, layout, animations.
- JavaScript - The muscles. It controls how things behave: drop-down menus, form validation, dynamic content that updates without reloading the page.
You can think of building a website like building a human: HTML is the bones, CSS is the appearance, and JavaScript is the movement and behavior.
The Two Paths: Which one is for you?
Now that the vocabulary lesson is out of the way, here’s the decision you need to make. There are two main approaches to building a website, and each has genuine advantages.
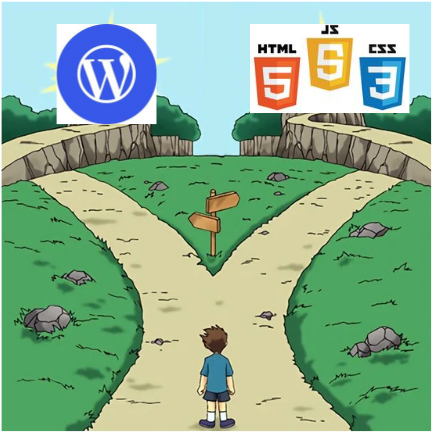
Path A: Code It Yourself (HTML/CSS/JS + VPS)
You write the actual code for your site. Every element, every style, every behavior - you built it. You then deploy it to a VPS where you configure the server yourself.
Who it’s for:
- Developers or aspiring developers who want to learn
- People who need a highly customized, lightweight site
- Anyone who wants full ownership of every line of their site
Pros:
- Total control over design and functionality
- Blazing fast - no bloat, no plugins, no overhead
- Teaches you skills that apply everywhere else in tech
- Cheapest long-term option
Cons:
- Steep learning curve if you’re brand new
- Takes longer to get something live initially
- You handle your own server maintenance.
Path B: WordPress (No-Code Route)
You use WordPress as your CMS - pick a theme, install plugins, and build your site through a visual interface. Your hosting provider (Hostinger or WordPress.com) handles the server side.
Who it’s for:
- Business owners, bloggers, creators who want speed
- People whose priority is content, not code
- Anyone who wants to be live in a day or two.
Pros:
- Get a professional-looking site up extremely fast
- Thousands of free themes and plugins
- No server knowledge required
- Easy to hand off to non-technical team members.
Cons:
- Less control over performance and customization
- Plugin bloat can slow your site down significantly
- Monthly costs are higher than a self-hosted coded site
- You’re dependent on WordPress’s ecosystem.
⚖️ Comparison Table
| Feature | Path A | Path B |
|---|---|---|
| Skill Required | HTML/CSS/JS basics | Minimal - near zero |
| Time to Launch | Days to weeks | Hours to days |
| Monthly Cost | ~$4-$6/month (VPS) | ~$3-$15/month (hosting) |
| Performance | ⚡ Excellent | 🟡 Good (depends on plugins) |
| Customisation | 🔓 Unlimited | 🔒 Limited to themes/plugins |
| Maintenance | You manage the server | Provider manages the server |
| SEO Control | Full | Good (with plugins like Yoast) |
| Best for | Developers & learners | Creators & businesses |
| Recommended Host | DigitalOcean / Linode | Hostinger / WordPress.com |
Neither path is objectively better - it depends entirely on what you’re building and how much you want to learn along the way. Both paths end at the same destination: a live website on the internet with your name on it.
WALK-THROUGH
We’ll walk through both paths step by step - what to do, where to do it, and why each step matters.
Now choose your path:
Path A: Code It Yourself
Let’s walk through the full process of building and deploying a hand-coded website from scratch.
Before you begin: You’ll need a proper development environment set up on your machine - a code editor, a terminal, and a few basic tools. If you haven’t done this yet, check out our guide on setting up your programming environment before continuing here.
Step 1: Plan Your Website
Before writing a single line of code, spend 20 minutes answering these questions:
- What is the purpose of this website? (Portfolio? Blog?? Business?)
- How many pages do you need? (Home, About, Contact, etc.)
- Do you need a contact form? A gallery? A blog?
Sketch out a rough wireframe - even on paper. Think of it as the blueprint before you start building. You wouldn’t construct a house and figure out where the rooms go as you go along.
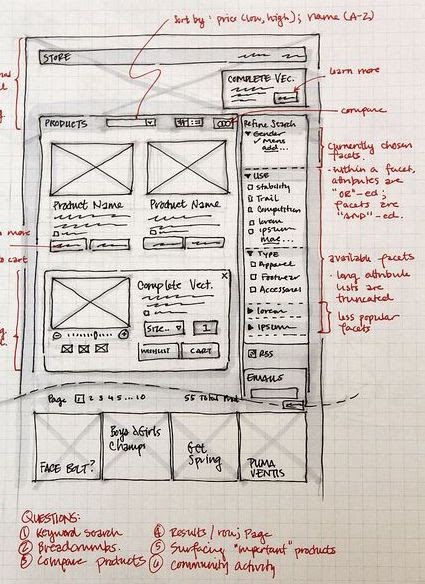 A rough wireframe - it doesn’t need to be perfect, just needs to exist.
Step 2: Write Your HTML
Create a new folder for your project. Inside it, create a file called index.html. This is the entry point of your website — every site starts here.
Here’s a clean starter template:
<!DOCTYPE html>
<html lang="en">
<head>
<meta charset="UTF-8" />
<meta name="viewport" content="width=device-width, initial-scale=1.0" />
<meta name="description" content="Your website description here" />
<title>Your Website Name</title>
<link rel="stylesheet" href="style.css" />
</head>
<body>
<!-- Navigation -->
<header>
<nav>
<a href="index.html" class="logo">YourBrand</a>
<ul>
<li><a href="index.html">Home</a></li>
<li><a href="about.html">About</a></li>
<li><a href="contact.html">Contact</a></li>
</ul>
</nav>
</header>
<!-- Main Content -->
<main>
<section class="hero">
<h1>Hello, World.</h1>
<p>Welcome to my website. This is where I introduce myself in one sentence.</p>
<a href="about.html" class="btn">Learn More</a>
</section>
</main>
<!-- Footer -->
<footer>
<p>© 2026 YourName. All rights reserved.</p>
</footer>
<script src="script.js"></script>
</body>
</html>
A few things to note:
- The
<head>section contains metadata - things the browser and search engines read but your visitors don’t see - The
<meta name="viewport">tag is critical for mobile responsiveness - don’t skip it - The
<link rel="stylesheet">connects your CSS file - The
<script>tag at the bottom loads your JavaScript after the page has loaded (this is intentional)
Repeat this for each page your site needs (about.html, contact.html, etc.), updating the content accordingly.
Step 3: Style with CSS
Create a style.css file in the same folder as your index.html. This is where all your visual design lives.
Here’s a clean, minimal starter stylesheet:
/* --- Reset & Base Styles --- */
*, *::before, *::after {
  margin: 0;
  padding: 0;
  box-sizing: border-box;
}

:root {
  --color-bg: #0d1117;
  --color-text: #e6edf3;
  --color-primary: #58a6ff;
  --color-accent: #3fb950;
  --font-body: 'Inter', sans-serif;
  --font-mono: 'JetBrains Mono', monospace;
}

body {
  background-color: var(--color-bg);
  color: var(--color-text);
  font-family: var(--font-body);
  line-height: 1.7;
}

/* --- Navigation --- */
nav {
  display: flex;
  justify-content: space-between;
  align-items: center;
  padding: 1.5rem 2rem;
  border-bottom: 1px solid #21262d;
}

nav ul {
  list-style: none;
  display: flex;
  gap: 2rem;
}

nav a {
  color: var(--color-text);
  text-decoration: none;
  transition: color 0.2s;
}

nav a:hover {
  color: var(--color-primary);
}

/* --- Hero Section --- */
.hero {
  max-width: 800px;
  margin: 6rem auto;
  padding: 0 2rem;
  text-align: center;
}

.hero h1 {
  font-size: clamp(2rem, 5vw, 3.5rem);
  font-family: var(--font-mono);
  color: var(--color-primary);
  margin-bottom: 1rem;
}

/* --- Button --- */
.btn {
  display: inline-block;
  margin-top: 1.5rem;
  padding: 0.75rem 1.75rem;
  background-color: var(--color-primary);
  color: #0d1117;
  border-radius: 6px;
  font-weight: 600;
  text-decoration: none;
  transition: background-color 0.2s;
}

.btn:hover {
  background-color: var(--color-accent);
}

/* --- Footer --- */
footer {
  text-align: center;
  padding: 2rem;
  border-top: 1px solid #21262d;
  color: #8b949e;
  font-size: 0.875rem;
}

/* --- Responsive --- */
@media (max-width: 768px) {
  nav ul {
    gap: 1rem;
  }

  .hero {
    margin: 3rem auto;
  }
}
A few CSS concepts worth understanding here:
- CSS Variables (
:root) - defined once at the top, used everywhere. Change your primary color in one place and it updates across your whole site. Think of it like a global settings file for your design. @mediaqueries - these are rules that only apply at certain screen widths, allowing you to adjust your layout for mobile.
Step 4: Add Interactivity with JavaScript
Create a script.js file. JavaScript is what separates a static page from a living, breathing one.
Here’s a practical example - a mobile navigation toggle, which almost every website needs:
// Mobile Navigation Toggle
const navToggle = document.querySelector('.nav-toggle');
const navMenu = document.querySelector('nav ul');

if (navToggle) {
  navToggle.addEventListener('click', () => {
    navMenu.classList.toggle('nav-open');
  });
}

// Smooth scroll for anchor links
document.querySelectorAll('a[href^="#"]').forEach(anchor => {
  anchor.addEventListener('click', function (e) {
    e.preventDefault();
    const target = document.querySelector(this.getAttribute('href'));
    if (target) {
      target.scrollIntoView({ behavior: 'smooth' });
    }
  });
});
JavaScript is the biggest of the three languages to learn, but for a basic website, you won’t need much of it. Most interactions (hover effects, transitions, animations) can be handled purely in CSS.
Step 5: Test Locally
Before deploying anything, open your index.html directly in a browser and make sure everything looks right. Better yet, use VS Code’s Live Server extension - it auto-refreshes your browser as you edit. Install it from the VS Code extension marketplace (it’s free).
Check:
- Does the layout look correct on desktop?
- Does it look correct on mobile? (Open browser DevTools → toggle device toolbar → simulate a phone)
- Do all your links work?
- Does your CSS load correctly?
Step 6: Register Your Domain
Time to get your address on the internet.
- Go to Namecheap
- Type your desired domain name in the search bar
- Pick your domain and add to cart (
.comis the standard, but.dev,.blog,.ioare all great for tech-focused sites) - During checkout, enable WhoisGuard (it’s free on Namecheap) - this hides your personal information from the public WHOIS database, because the internet doesn’t need your home address
- Complete your purchase - you now own a domain name (well, you’re renting it, but close enough)
💡 Pro tip: Don’t buy your domain and hosting from the same provider. If you ever want to move hosts, it’s much easier when your domain and hosting are separate. Register your domain on Namecheap, host elsewhere.
Step 7: Set Up Your VPS
You have two excellent VPS options:
-
DigitalOcean - Beginner-friendly interface, excellent documentation, global data center coverage. Their entry-level Droplet (their word for a VPS) starts at $4/month and is more than enough for a personal or small business website.
-
Linode (Akamai) - Slightly more technical than DigitalOcean but extremely reliable. Comparable pricing, great performance.
Both are solid choices. For absolute beginners, DigitalOcean’s UI and documentation are slightly more approachable — their tutorials are honestly some of the best technical writing on the internet.
Setting up your DigitalOcean Droplet:
- Create a DigitalOcean account
- Click Create → Droplets
- Choose your settings:
- Region: Pick the one geographically closest to your audience
- OS: Ubuntu 24.04 LTS (the most widely supported option)
- Plan: Basic Shared CPU → $6/month (1GB RAM, 25GB SSD) is plenty for a starter site
- Under Authentication, choose SSH Keys (more secure than password — here’s how to generate one )
- Click Create Droplet
You’ll get an IP address - copy it.
Step 8: Install a Web Server (Nginx)
SSH into your server and install Nginx - the web server software that will receive incoming requests and serve your website files:
# Connect to your server
ssh root@YOUR_SERVER_IP

# Update packages once you're in your server
sudo apt update && sudo apt upgrade -y

# Install Nginx on the server
sudo apt install nginx -y

# Start Nginx and enable it to run on boot
sudo systemctl start nginx
sudo systemctl enable nginx
Now if you visit your server’s IP address in a browser, you should see the default Nginx welcome page. That means it’s working.
Step 9: Deploy Your Website Files
Upload your website files to your server. The easiest method for beginners is scp (Secure Copy Protocol):
# From your LOCAL machine (not the server)
# Replace with your actual folder path and server IP
scp -r /path/to/your/website/* root@YOUR_SERVER_IP:/var/www/html/
Your files are now on the server. Nginx serves from /var/www/html/ by default, so your index.html will be what visitors see.
Step 10: Point Your Domain to Your Server
Back in Namecheap:
- Go to your Domain List → click Manage on your domain
- Go to the Advanced DNS tab
- Delete the default records and add these:
| Type | Host | Value | TTL |
|---|---|---|---|
| A Record | @ | YOUR_SERVER_IP | Automatic |
| A Record | www | YOUR_SERVER_IP | Automatic |
DNS changes can take 10 minutes to 48 hours to propagate. Once done, typing your domain into a browser should load your website.
Step 11: Enable HTTPS (SSL Certificate)
A website without HTTPS in 2026 is like showing up to a job interview in pyjamas — technically possible, but you’re sending all the wrong signals. SSL is also free now, so there’s no excuse.
Install Certbot (which basically handles Let’s Encrypt certificates automatically):
sudo apt install certbot python3-certbot-nginx -y

# Replace yourdomain.com with your actual domain
sudo certbot --nginx -d yourdomain.com -d www.yourdomain.com
Follow the prompts presented to you and when done, Certbot will automatically configure your Nginx to use HTTPS and handle renewal. Your site now has a padlock 🔒.
CONGRATULATIONS! After following the steps above properly and setting everything up, your site is now up, running and accessible on the internet.
Path B: WordPress (No-Code Route)
If Path A is building your own house from materials, Path B is buying a prefabricated house and customizing the interior. You’re not writing code - you’re using a visual interface to create and manage your site, and WordPress takes care of the structure underneath.
Step 1: Choose Your Hosting
You have two strong options:
-
Hostinger - One of the most affordable managed WordPress hosts out there. Their Business plan (~$3–7/month) includes WordPress pre-installed, a free domain for the first year, SSL certificate, and daily backups. Their on-boarding is very beginner-friendly.
-
WordPress.com - The official WordPress-hosted platform. The advantage is simplicity - everything is in one place. The trade-off is slightly less flexibility on the lower plans. Good starting point if you want the absolute minimum friction.
Quick Reminder: What’s the difference between WordPress.org and WordPress.com? WordPress.org is the free, open-source software you install on your own hosting (like Hostinger). WordPress.com is a hosted platform managed by Automattic - they take care of everything but have more restrictions on lower plans. For maximum flexibility, use WordPress.org software on your own host.
For this guide, we’ll go with the recommended approach: Hostinger + WordPress.org.
- Go to Hostinger and sign up for their Business Web Hosting or WordPress Starter plan
- Choose your billing period (longer = cheaper per month)
- Either register a new domain through Hostinger or connect your existing Namecheap domain later
- Complete checkout
Step 2: Install WordPress
With Hostinger, this takes about 45 seconds:
- Log into your hPanel (Hostinger’s control panel)
- Go to Website → Auto Installer
- Click WordPress
- Fill in your site name, admin username, and password
- Click Install
WordPress is now installed. You can access your admin dashboard at yourdomain.com/wp-admin.
Step 3: Choose a Theme
Your theme controls the overall look and layout of your site. Think of it as the architectural style of your prefab house — you can pick modern, minimal, bold, or corporate.
- In your WordPress dashboard, go to Appearance → Themes
- Click Add New
- Browse themes - filter by your use case (blog, portfolio, business, etc.)
- For a clean, fast, professional-looking site, we recommend starting with one of these free themes:
- Astra - Extremely fast, good customization, pairs perfectly with page builders
- GeneratePress - Lightweight and clean, developer-friendly
- Kadence - Modern design with great starter templates
- Click Install then Activate.
Step 4: Install Essential Plugins
Plugins are what make WordPress powerful - they add functionality without requiring you to code anything. That said, don’t go plugin-crazy. Every plugin adds a little weight to your site. Install only what you actually need.
Here are the essentials for most websites:
| Plugin | Purpose |
|---|---|
| Yoast SEO or Rank Math | Search engine optimization |
| Wordfence | Security and firewall |
| UpdraftPlus | Automatic backups |
| WP Super Cache or W3 Total Cache | Speed optimization |
| Contact Form 7 | Contact forms |
| Smush | Image optimization |
Install them via Plugins → Add New → Search for each one.
Step 5: Create Your Pages
- Go to Pages → Add New
- Use the Gutenberg block editor (WordPress’s built-in visual editor) to build your pages
- Add your content using blocks - headings, paragraphs, images, buttons, columns, etc.
- Create at least: Home, About, and Contact pages
Alternatively, if you want a more powerful drag-and-drop experience, Elementor (free version is very capable) is the most popular WordPress page builder and makes designing pages much more intuitive.
Step 6: Connect Your Domain (If Purchased Separately)
If you registered your domain on Namecheap separately, you need to point it to Hostinger:
- In Hostinger’s hPanel, go to Hosting → Manage → DNS / Nameservers
- Copy Hostinger’s nameservers (they look like
ns1.dns-parking.com) - In Namecheap, go to your Domain List → Manage → Nameservers
- Select Custom DNS and paste Hostinger’s nameservers
- Save and wait for propagation (up to 48 hours, usually much faster)
Step 7: Enable SSL (HTTPS)
In Hostinger’s hPanel:
- Go to Security → SSL
- Click Install on your domain
- Hostinger handles the rest - SSL is free and auto-renews
Back in WordPress, go to Settings → General and make sure both your WordPress Address and Site Address start with https:// (not http://).
Your WordPress site is now live, secure, and ready for content. CONGRATULATIONS!!!🎉.
Tools & Resources
Here’s a quick summary of every tool mentioned in this guide, with links to get started:
Domain Registration
- Namecheap - Best value domain registrar, includes free WhoisGuard privacy protection
Web Hosting
- Hostinger - Best for WordPress / managed hosting beginners
- WordPress.com - Best for the absolute simplest WordPress setup
- DigitalOcean - Best VPS for beginners who want to learn servers
- Linode (Akamai) - Reliable VPS alternative with competitive pricing
Code Editors
- VS Code - Free, open-source, and the most popular code editor in the world. Has a plugin for everything.
- JetBrains IDEs - Professional-grade editors (WebStorm for web, IntelliJ for general). Paid, but worth it when you’re serious.
WordPress Tools
What’s Next?
You now have a live website. But the work doesn’t stop here - a website is a living thing, not a “set it and forget it” project. Here are the natural next steps to grow from here:
- Write content consistently - Whether it’s blog posts, portfolio updates, or product pages, content is what brings visitors and keeps them coming back
- Learn basic SEO - Understanding how search engines find and rank your site will pay dividends for years
- Set up Google Analytics - Know who’s visiting, where they’re coming from, and what they’re reading
- Learn Git - If you took Path A, version control is non-negotiable. It’s your safety net, your time machine, and your collaboration tool all in one
If this guide helped you, consider sharing it with someone who’s been saying “I should build a website” for the last six months. We both know who that person is. 😄
Have questions? Drop them in the comments below or come find us on Telegram and Discord via the links in the footer - we’re always happy to help.