How to Become a Cross-Platform Developer in 2026
If you’ve read the Mobile Developer post and the quiz pointed you here - or you already knew “one codebase, both platforms” was the appeal before you got anywhere near a quiz - this is the full, deep breakdown. Native Android and native iOS each already have their own dedicated posts on this blog. This one is about building for both at once, from a single codebase.
Let’s get into it.
What Is Cross-Platform Development?
Cross-platform development means writing your app’s code once and shipping it to both iOS and Android - increasingly getting to web and desktop too - instead of building and maintaining two entirely separate native codebases in two entirely different languages for just a single app.
Compare this to what the Android and iOS posts on this blog each cover: a native Android developer writes Kotlin, a native iOS developer writes Swift, and a company wanting both apps either hires two separate teams or asks one team to learn both stacks. Cross-platform development collapses that into one codebase, one language, and - for the large majority of a typical app’s UI and logic - one implementation shared across every platform you target.
That sharing isn’t total. Some platform-specific work is still unavoidable, and this post is honest about exactly where that line sits, rather than pretending “cross-platform” means “never think about the platform again.”
Why Cross-Platform Matters in 2026
The economics are the whole argument: cross-platform development typically saves 35-50% of development cost compared to building two separate native apps, while sharing somewhere between 60-95% of the actual codebase between platforms. For most consumer apps - the lists, forms, feeds, and navigation flows that make up the majority of what gets built - modern Flutter and React Native apps are genuinely indistinguishable from native ones to the people using them. Cross-platform now fits roughly 80% of mobile apps being shipped.
That other 20% is real, though, and worth naming rather than glossing over. Native still wins outright for performance-critical work - graphically intensive games, AR/VR experiences - and for apps that need to use brand-new OS features the moment they ship, before a cross-platform framework’s team has had time to add support for them. Apps that lean heavily on deep, unusual hardware integration also tend to be easier to get right natively.
The verdict: For the large majority of apps - especially anything aiming to reach both iOS and Android users without doubling your team - cross-platform is the pragmatic default in 2026, not a compromise. Reach for native instead when your app’s whole value proposition depends on squeezing out every last bit of platform-specific performance or hardware access, not by default.
Flutter vs React Native: The Honest Breakdown
Here’s the honest case for why Flutter is the framework this roadmap teaches, built on real evidence rather than just picking a side.
The Honest case for Flutter: It holds roughly 46% of surveyed mobile developers’ adoption in 2026 - the largest single share of any cross-platform framework, ahead of React Native. It’s Google-backed, and real production apps prove it scales: eBay Motors, Alibaba, Google Pay, and several ByteDance apps all run on Flutter. Architecturally, Flutter renders every pixel itself through its own engine (Skia, moving to Impeller) instead of bridging to each platform’s native UI components - which is exactly why Flutter apps look and behave identically on iOS and Android without the subtle inconsistencies that a bridged approach can introduce. And Flutter’s reach in 2026 goes well past mobile: the same codebase now genuinely extends to web, desktop (Windows, macOS, Linux), and even embedded targets like Wear OS, Android Auto, and smart TVs. If you eventually want to take that same codebase to the desktop, the Desktop App Development post on this blog picks up exactly where this one leaves off.
The honest case for React Native, too: It isn’t losing because it’s worse - it’s a different bet. If you’re already on a team with a React web app, React Native lets you share real logic and patterns between web and mobile, and it draws on the largest JavaScript/TypeScript talent pool in the industry, backed by Meta. React Native’s “New Architecture” (the Fabric renderer and TurboModules) has closed most of the old performance gap that came from bridging to native components. If your team already lives in React, React Native is very often the smarter choice - not a consolation prize.
Two more names worth knowing, briefly: Kotlin Multiplatform (KMP) - mentioned in passing in the Android post on this blog - is gaining real traction in enterprise settings for sharing business logic (not UI) across platforms while keeping fully native interfaces. .NET MAUI is Microsoft’s cross-platform answer, relevant mainly if your team is already deep in C# and the .NET ecosystem.
One name worth actively avoiding: Xamarin. Microsoft officially ended support for Xamarin and Xamarin.Forms on 1 May 2024, in favour of .NET MAUI. If you find a tutorial teaching Xamarin as a current option, it’s out of date - treat it the same way this blog treats any pre-2020 Java-and-XML-only Android tutorial.
This roadmap teaches Flutter as the primary path.
If you’re already deep in a React/JS ecosystem specifically, React Native is a genuinely valid alternative - the fundamentals of state, components, and navigation transfer conceptually either way. But if you’re just starting out, don’t worry about making the perfect choice up front - follow this roadmap, and you’ll have the fundamentals to make that call for yourself later if you ever need to.
Do You Still Need a Mac?
Short answer: Yes, for the iOS half of your app - and it’s worth understanding exactly why, because “cross-platform” doesn’t mean what a lot of beginners assume it means.
Apple requires every iOS app to be compiled and code-signed using Xcode, and Xcode ONLY runs on macOS. That’s an Apple platform rule, and it applies regardless of what wrote your source code - Swift, Kotlin Multiplatform, Flutter, React Native, all of it. When you write a Flutter app, your Dart code gets compiled ahead-of-time into native ARM machine code for each target platform. For Android, that compiled code gets packaged into an APK or AAB through Gradle, which runs on Windows, macOS, or Linux without issue. For iOS, that same compiled code still has to be linked into an iOS app bundle and signed using Apple’s toolchain - and that final step only happens inside Xcode, on macOS.
So “write once” genuinely covers your application code and UI - that part really is shared. It does not cover the build pipeline. The pipeline stays gated by Apple’s own rules, completely independent of the framework that generated the source.
What you can do entirely without a Mac: Write 100% of your Dart and Flutter code, build and test your app extensively on an Android emulator or a real Android device, and even use Flutter’s web target (flutter run -d chrome) to iterate on UI quickly without any platform SDK installed at all.
What you genuinely cannot do without access to a Mac: Produce a runnable, installable iOS build, test on the iOS Simulator, code-sign the app with an Apple Developer certificate, or submit anything to App Store Connect.
The real workaround, if you don’t own a Mac: You don’t need to buy one outright. Cloud CI services with macOS build runners - Codemagic and Bitrise both offer this specifically for Flutter and React Native projects, and GitHub Actions also provides macOS runners - let you trigger a full iOS build and even push it to TestFlight from a pipeline, without ever touching physical Mac hardware yourself. Renting Mac time through a service like MacinCloud is another option some developers use for occasional iOS builds. None of these remove the requirement; they just mean the requirement doesn’t have to be your hardware.
Building Your First Screen in Flutter
Let’s build the same small profile card this blog has used before - a name, a bio, and a button that toggles the bio’s visibility - so you can see Flutter’s widget-tree approach directly.
import 'package:flutter/material.dart';

void main() => runApp(const ProfileCardApp());

class ProfileCardApp extends StatelessWidget {
  const ProfileCardApp({super.key});

  @override
  Widget build(BuildContext context) {
    return const MaterialApp(home: Scaffold(body: Center(child: ProfileCard())));
  }
}

class ProfileCard extends StatefulWidget {
  const ProfileCard({super.key});

  @override
  State<ProfileCard> createState() => _ProfileCardState();
}

class _ProfileCardState extends State<ProfileCard> {
  bool bioVisible = true;

  @override
  Widget build(BuildContext context) {
    return Column(
      mainAxisAlignment: MainAxisAlignment.center,
      children: [
        const Text('John Doe', style: TextStyle(fontSize: 24, fontWeight: FontWeight.bold)),
        if (bioVisible)
          const Padding(
            padding: EdgeInsets.only(top: 8),
            child: Text('Aspiring cross-platform developer, learning Flutter one widget at a time.'),
          ),
        Padding(
          padding: const EdgeInsets.only(top: 16),
          child: ElevatedButton(
            onPressed: () => setState(() => bioVisible = !bioVisible),
            child: Text(bioVisible ? 'Hide Bio' : 'Show Bio'),
          ),
        ),
      ],
    );
  }
}
Everything you see on screen in Flutter is a widget - text, buttons, padding, even layout containers like Column. You build a UI by nesting widgets inside each other, which is why this is called the widget tree. bioVisible is the state that lives inside _ProfileCardState, and calling setState() tells Flutter “this state changed, rebuild whatever depends on it” - conceptually the same idea as remember { mutableStateOf(...) } in Jetpack Compose on the Android post, or @State in SwiftUI on the iOS post. Different languages, same underlying philosophy: describe the UI as a function of state, and let the framework handle updating the screen when that state changes.
Tools You’ll Work With
- Flutter SDK & Dart - The framework and language everything in this roadmap is built on.
- VS Code or Android Studio - Both have strong official Flutter/Dart plugin support; pick whichever you’re already comfortable with.
- pub.dev - Dart and Flutter’s package repository, the equivalent of npm or PyPI for this ecosystem.
- Firebase - The most common backend-as-a-service pairing for Flutter apps: authentication, a real-time database, crash reporting, push notifications.
Hot Reload
This is one of Flutter’s defining features, and it’s worth understanding properly rather than treating it as a footnote. Hot Reload injects your latest code changes into a running app in under a second, without restarting the app or losing its current state - change a colour, tweak a layout, adjust a piece of text, save the file, and watch it update instantly on your emulator or device, still sitting on whatever screen you were testing. Compare that to a typical native development loop of rebuilding and relaunching an app after every change, and it’s a genuinely different day-to-day experience, not just a minor convenience.
Flutter DevTools
Flutter’s official suite of debugging and performance tools, built into both VS Code and Android Studio. The two you’ll reach for constantly: The Widget Inspector, which lets you click on anything rendered on screen and see exactly which widget produced it and how it’s nested in the tree, and the Performance/Timeline view, which shows you frame-by-frame rendering data so you can actually see where a janky scroll or a slow animation is coming from, instead of guessing.
If you’re curious about AI-assisted coding tools specifically, the Android Developer post on this blog covers Gemini in Android Studio in depth - the same “use it to move faster through things you already understand, not to skip understanding them” principle applies here too, and Gemini’s IDE integrations work with Dart and Flutter as well.
Jobs, Salaries & Demand in 2026
The Job Market
Cross-platform roles are in strong, consistent demand - startups and small teams in particular default to it, since one team shipping one codebase to both platforms is a direct, immediate cost saving over hiring separate native Android and iOS developers. Companies that need to move fast on a limited budget, or that are validating a product before committing to platform-specific investment, weight cross-platform hiring heavily.
Salary Ranges (Approximate, 2026)
| Level | Nigeria (NGN/year) | Global Remote (USD/year) |
|---|---|---|
| Junior | ₦2M - ₦4M | $40,000 - $70,000 |
| Mid-level | ₦4M - ₦8.5M | $70,000 - $120,000 |
| Senior | ₦8.5M - ₦19M+ | $120,000 - $190,000+ |
Disclaimer: These are directional figures - actual pay varies significantly by company, specialisation, and location. Developers who can comfortably ship to both app stores, and who understand the platform-specific edges rather than treating Flutter as a black box, tend to sit toward the higher end of these ranges.
The Full Roadmap
This is the full zero-to-hero roadmap to follow in order to have the skills necessary to land a job or ship your own app to both stores. Follow it stage-by-stage and move to the next stage only when you’ve satisfied the criteria to do so.
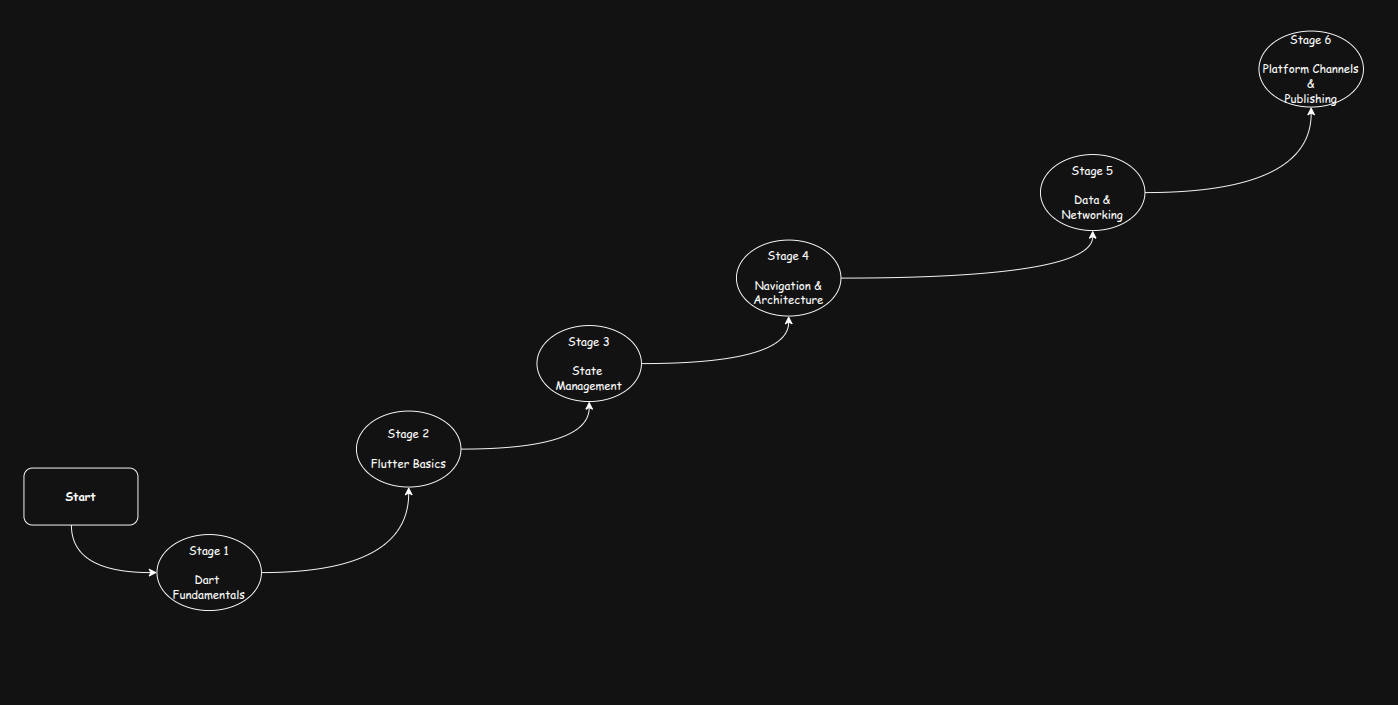
Stage 1 - Dart Fundamentals (3-5 weeks)
Variables, data types, control flow, functions, classes, null safety, and async/await. Dart will feel familiar if you’ve read the Kotlin section of the Android post on this blog - both are modern, null-safe, object-oriented languages designed with similar goals in mind.
You’re ready to move on when: You can write and reason about Dart code involving classes and async functions without constantly checking documentation.
Stage 2 - Flutter Basics (5-7 weeks)
Widgets, the widget tree, StatelessWidget vs StatefulWidget, layout widgets (Column, Row, Stack), and Hot Reload as your core development loop. This is where the “everything is a widget” mental model needs to genuinely click before moving on.
You’re ready to move on when: You can build a multi-screen static app from scratch, comfortably nesting widgets to produce a specific layout without guessing.
Stage 3 - State Management (6-8 weeks)
Before the tools, the concept: State is whatever data currently determines what’s on screen - is a toggle on, has the data finished loading, what’s in a form field. Think of it like a car’s dashboard: the speedometer needle’s position is state, and it changes as something happens elsewhere in the system (you press the accelerator). In a tiny app, you can keep state local to a single widget, the way bioVisible worked in the example above. In a real app, many different screens need to read and react to the same piece of state - is the user logged in, what’s in the shopping cart - and passing that manually through every widget in between becomes unmanageable fast. That’s the actual problem state management solves.
Now the honest pick: Provider is what most existing tutorials and Flutter’s own older documentation still teach, and it’s worth understanding since you’ll meet it in a lot of existing code. Riverpod on the other hand, is built by the same author specifically to fix Provider’s limitations - it doesn’t need a BuildContext to read state and it’s meaningfully easier to test - and is the modern default for new projects in 2026, and where this roadmap recommends you land. Bloc is more structured and opinionated, popular on larger, enterprise-scale teams that want a strict separation between business logic and UI, at the cost of a steeper learning curve. Learn Provider’s core idea quickly so you can read older code, then build real fluency in Riverpod, and only reach for Bloc if a team you join already uses it.
You’re ready to move on when: You can explain, in your own words, why a shopping cart’s contents shouldn’t just live inside a single screen’s widget - and you can build a small app using Riverpod that shares state across at least two screens.
Stage 4 - Navigation & Architecture (3-5 weeks)
Screen-to-screen navigation (Flutter’s Navigator and named routes), and organising a growing app into a sensible folder structure and layered architecture rather than one enormous file.
You’re ready to move on when: You can add a new screen to an existing app and wire up navigation to and from it without restructuring everything around it.
Stage 5 - Data & Networking (5-7 weeks)
Making HTTP requests with the http or dio packages, parsing JSON, handling loading and error states properly, and local storage options (shared_preferences for simple key-value data, sqflite or Hive for anything more structured). If you want the back-end side of this conversation explained properly, the back-end development post on this blog covers it in full.
You’re ready to move on when: You can build an app that fetches data from a real API, stores some of it locally, and displays it - handling loading and error states, not just the happy path.
Stage 6 - Platform Channels & Publishing (4-6 weeks)
Two distinct things here, both genuinely worth knowing early rather than discovering under pressure. First, Platform Channels: The mechanism Flutter gives you for writing a small amount of native Swift or Kotlin code and calling it from Dart, for the moments - and they do come up - when a plugin for what you need simply doesn’t exist yet. You don’t need to be a native expert to use this, just to know it exists and roughly how it works before you hit a wall assuming Flutter can’t do something it actually can, with a small bridge. Second, the actual submission process to both stores: app signing for both platforms, the Play Console and App Store Connect review processes, and - given the earlier section on this - making sure your iOS build pipeline (your own Mac or a CI service) is sorted well before submission day, not the week of it.
You’re ready to move on when: You’ve published something - even something small - to at least one store, and can explain what Platform Channels are for even if you haven’t needed to write one yet.
Building Your Portfolio
Cross-platform hiring, like the rest of software development, is portfolio-driven.
- GitHub - A well-documented profile with real, working Flutter projects and a commit history that shows consistent progress.
- A published app on at least one store - Google Play Console’s one-time $25 fee is a lower barrier than Apple’s $99/year developer account, so if you’re publishing to only one store first while you sort out iOS build access, Android is the more accessible starting point.
- pub.dev package contributions - Publishing a small, genuinely useful package, or contributing to an existing one, is a concrete, verifiable signal of engagement with the ecosystem beyond tutorial projects.
Certifications
Here’s the honest version, and it’s a different flavour of honest than the Android post’s cert section. Searching for a Flutter certification surfaces something calling itself “AFD-200 / Flutter Certified Application Developer” - but every result behind it is a third-party exam-dump or practice-test seller (the kind of site selling “authorized dumps” and “verified answers”), with no official page from Google or flutter.dev anywhere in sight. One listing even mislabels itself an “Android AFD-200 Practice Test,” which is the kind of inconsistency that gives away a templated content-mill page rather than a real credential. Treat this the way you’d treat any exam-dump site for any subject: It isn’t a real, employer-recognised certification, and spending money on “AFD-200 dumps” is not time or money well spent.
There is no legitimate official cross-platform certification worth pursuing in 2026. A published app and a solid GitHub profile carry real weight here; a certificate from a dump-mill site carries none.
Common Mistakes
A shared codebase != shared behaviour. Date pickers, back-button handling, and safe-area/notch spacing can all render or behave differently on iOS versus Android from the exact same code. Test on both before you consider a feature done, not just the platform you personally use.
As covered above, this isn't a real, employer-recognised credential - it's a name attached to a cluster of exam-dump seller sites. Time and money spent here is better spent shipping something real.
Microsoft ended Xamarin support on 1 May 2024. Any content teaching it as a current option predates that and should be treated the same way you'd treat a pre-2020 Java-and-XML-only Android tutorial - historically useful context, not a starting point.
Given the section above, this is an entirely avoidable scramble. Sort out your iOS build pipeline - your own Mac or a CI service with macOS runners - well before you're actually ready to submit, not the week you planned to launch.
Installing Riverpod or Bloc because a tutorial said to, without understanding why passing state manually breaks down at scale, produces code you can copy but can't debug or extend. Understand the problem first, the library second.
Frequently Asked Questions
This post's roadmap teaches Flutter, given its current lead in adoption share, its multi-platform reach beyond mobile, and the consistency of rendering everything through its own engine rather than bridging to native components. That said, React Native is a genuinely strong choice if you're already on a team with an existing React web app - the fundamentals of components, state, and navigation transfer conceptually either way.
Not to get started. You'll write the overwhelming majority of your app in Dart. The one place native knowledge helps is Platform Channels - the mechanism for bridging to native code when a plugin doesn't exist for something you need - but you can learn that mechanism as it comes up rather than needing Kotlin or Swift fluency upfront.
You can skip owning one - you can't skip needing access to one when it's time to build, test, or submit the iOS half of your app. Cloud CI services with macOS runners (Codemagic, Bitrise, GitHub Actions) let you do this without buying Mac hardware yourself, covered in more detail earlier in this post.
Easier in one specific sense - one codebase instead of two - but not easier in every sense. You still need to understand both platforms' conventions well enough to catch the places they diverge, and you still hit the same Mac requirement for iOS that native iOS development has. It trades "learn two languages and two codebases" for "learn one framework deeply enough to know where it can't fully hide the platform underneath."
No. It isn't an official, employer-recognised certification - it's a name attached to a cluster of third-party exam-dump seller sites, with no legitimate certifying body behind it. Time and money are better spent shipping a real app.
Following this roadmap with consistent effort, most people reach a junior, job-ready standard in 9 to 15 months - Dart fundamentals, real comfort with Flutter and state management, and at least one properly shipped app. As with the native posts on this blog, genuine architectural understanding is what most interviews actually test for, not just syntax familiarity.
Where to Go From Here
You’ve got the full picture: What cross-platform development actually involves, the honest Flutter-vs-React-Native case, why the Mac requirement doesn’t disappear just because your codebase is shared, what state management actually solves and which library to reach for, and a complete roadmap from Dart fundamentals through shipping to both stores.
This closes out the mobile side of the App Development family on this blog - App Developer, Mobile Developer, iOS, Android, and now Cross-Platform. If Flutter’s reach past mobile has you curious, the Desktop App Development post picks up exactly where this one leaves off.
For questions, portfolio feedback, or to argue about Flutter vs React Native - the community links are in the footer.