What is Web/Front-end Development? And How to Get Into It in 2026
If you’ve already read the Front-end vs Back-end post, you know what side of the fence front-end sits on. This post picks up from there and goes deeper into what front-end development actually is under the hood, how its three core technologies work, and a complete roadmap that takes you from writing your first line of HTML to being confident with the full front-end stack in 2026.
If you haven’t read that post, no problem. Everything here stands on its own. By the end, you’ll know what front-end development is, how the web actually works, and exactly what to learn - and in what order - to get into it.
Let’s get started.
The Big Question: What is the Web?
Before you write a single line of front-end code, it helps to understand what the web actually is at a mechanical level. Not the philosophical version - the literal one.
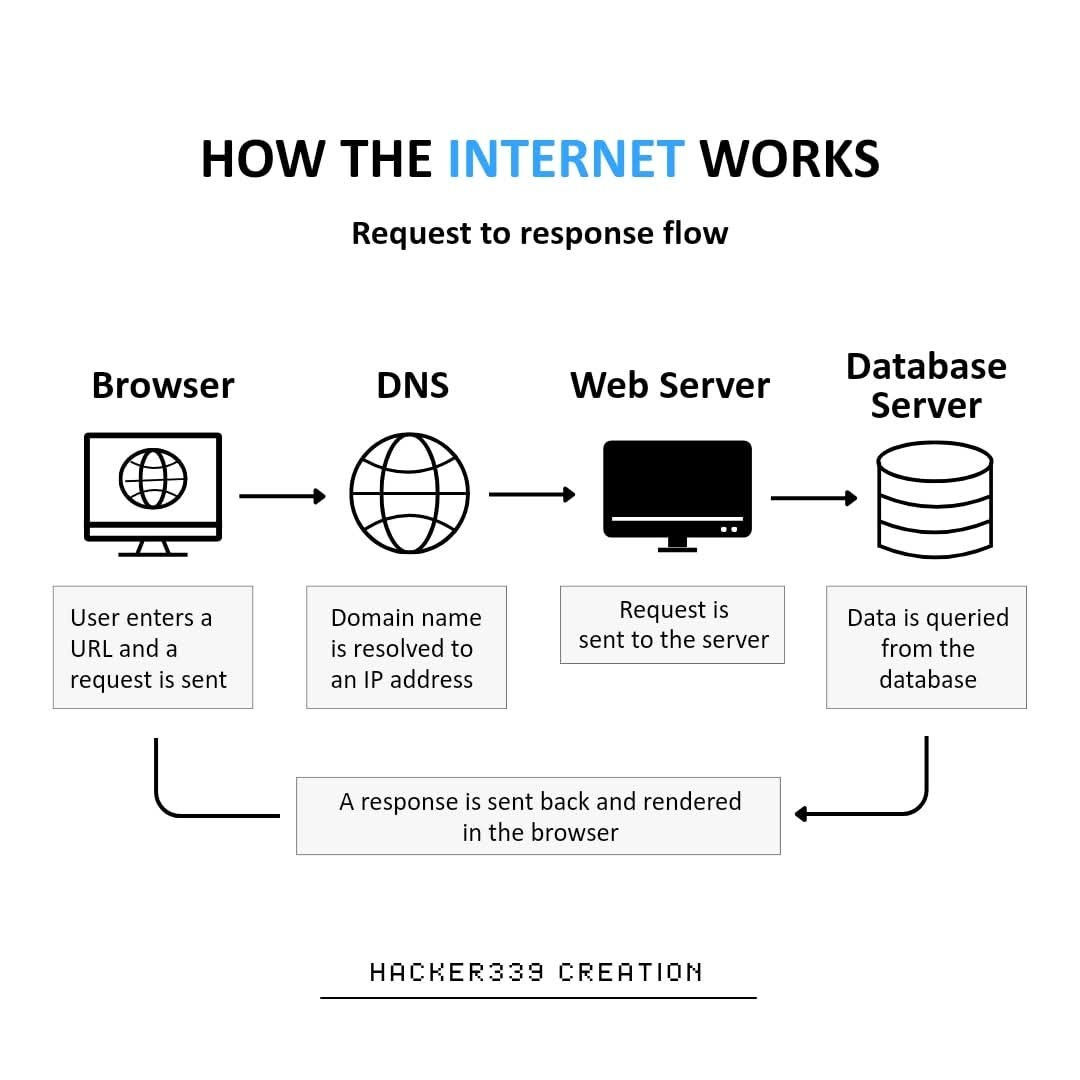
Here’s what happens every time you type a URL into a browser and hit enter:
- Your browser sends a request to a server somewhere in the world that essentially says “give me the page at this address.”
- That server receives the request and sends back a response - a bundle of files.
- Your browser receives those files and renders them - turning raw code into the page you’re looking at.
The files the server sends back are almost always the same three types: HTML, CSS, and JavaScript. Your browser knows exactly what to do with each one.
That’s the web at its core - a giant system of requests and responses, and your browser is the engine that turns those responses into something a human can actually see and use.
Front-end development is the work that goes into building those three files.
What Front-end Development Actually Is
Front-end development is the discipline of building everything a user sees, clicks, reads, and interacts with on a website or web application. Every button, every layout, every animation, every form - all of it is front-end.
But here’s the part that goes beyond the surface definition: front-end development is specifically about what runs in the browser. The browser is your runtime environment. When you write front-end code, you’re writing code that will be downloaded by a user’s device and executed locally - inside their browser, on their machine.
This has real implications:
- Your code runs on devices you don’t control - phones, old laptops, high-resolution widescreen monitors. It needs to work on all of them.
- Different browsers (Chrome, Firefox, Safari) can behave slightly differently. Part of the job is making sure your code handles that.
- Performance matters in a direct and immediate way - slow front-end code means the user is sitting there waiting, and they will leave.
A front-end developer owns:
- The structure of the page - what elements exist and how they’re organised
- The appearance - colours, spacing, typography, layout, how it adapts to different screen sizes
- The behaviour - what happens when a user clicks something, types something, scrolls, or submits
- The experience - does this feel good to use? Is it accessible to everyone? Is it fast?
What a front-end developer does not own: anything that happens after a request leaves the browser. The moment data gets sent to a server, that’s back-end territory.
The Three Foundations
Every front-end in existence is built on three technologies. Not some of them - all of them. They’re not optional, they’re not interchangeable, and they don’t do the same thing. Each one has a specific job.
HTML - The Structure
HTML (HyperText Markup Language) defines the structure and content of a webpage. It tells the browser what elements exist on the page, what order they’re in, and what they contain.
It does this using tags - labels wrapped in angle brackets that describe what each piece of content is:
<!DOCTYPE html>
<html lang="en">
<head>
  <meta charset="UTF-8">
  <title>My First Page</title>
</head>
<body>
  <h1>Hello, World</h1>
  <p>This is my first webpage. It doesn't look like much yet.</p>
  <a href="https://dynamicbytes.blog">Visit DynamicBytes</a>
</body>
</html>
Save that as index.html and open it in a browser. You’ll see a heading, a paragraph, and a link. No colour, no styling - just raw structure. That is HTML’s job and only HTML’s job. It doesn’t care what anything looks like.
A few things worth noticing right away:
- Tags come in pairs - an opening tag (
<h1>) and a closing tag (</h1>) - The
<head>section holds information the browser needs but doesn’t display to the user - The
<body>is everything the user actually sees on the page
CSS - The Appearance
CSS (Cascading Style Sheets) controls how HTML elements look. Colours, fonts, spacing, sizes, layout, animations - all CSS.
You write CSS as a set of rules. Each rule targets one or more HTML elements and tells the browser how to style them:
/*Styling for the body tag*/
body {
  background-color: #1a1a2e;
  font-family: sans-serif;
  color: #e0e0e0;
}

/*Styling for the header 1 tag*/
h1 {
  font-size: 2rem;
  color: #e94560;
}

/*styling for the paragraph tag*/
p {
  line-height: 1.7;
  max-width: 600px;
}
Link this to the HTML from the previous example and the page now has a dark background, a coloured heading, and readable paragraph text. Same structure - completely different appearance.
The “cascading” in Cascading Style Sheets refers to the fact that styles can be inherited and overridden - a child element inherits its parent’s styles unless told otherwise. It’s one of the things beginners find most confusing early on, but it becomes intuitive quickly with practice.
JavaScript - The Behaviour
JavaScript is a full programming language that runs in the browser and makes pages interactive and dynamic. Clicking a button and seeing something happen, a drop-down menu appearing, a form validating your input before it’s submitted, content loading without the entire page refreshing - all JavaScript.
const button = document.querySelector('button');
const message = document.querySelector('#message');

button.addEventListener('click', function() {
  message.textContent = 'You clicked the button.';
  message.style.color = '#e94560';
});
This finds a button on the page, listens for a click event, and when one happens - it updates the text and colour of another element. That’s JavaScript’s core pattern: select an element, listen for an event, do something in response.
JavaScript is also how front-end code communicates with back-end services. When you submit a form and the data goes to a server without the page reloading, that’s JavaScript making a request behind the scenes and handling whatever comes back.
How They Work Together
The relationship between the three never changes:
| Technology | Role | Analogy |
|---|---|---|
| HTML | Structure and content | The skeleton |
| CSS | Visual appearance | The skin and clothes |
| JavaScript | Interactivity and behaviour | The muscles |
Remove any one of them and something breaks. HTML without CSS is functional but rough. HTML and CSS without JavaScript is polished but static. All three together is a real, working front-end.
Build Your First Webpage
Enough theory. Let’s build something.
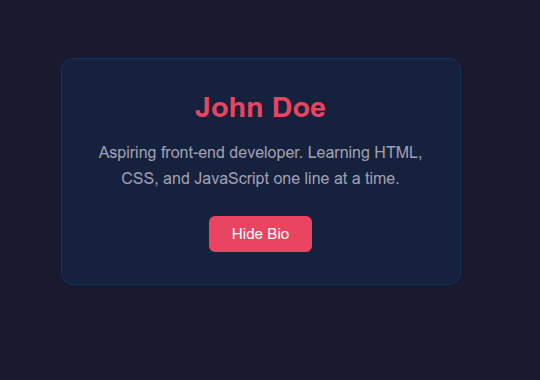
By the end of this section you’ll have a working profile card - styled, interactive, and entirely your own code. You don’t need anything installed except a text editor and a browser. If you’re on Linux and not set up with VS Code yet, the Bash scripting post has you covered.
Create a folder called profile-card somewhere on your machine. Inside it, create three files:
profile-card/
├── index.html
├── style.css
└── script.js
Step 1 - The HTML
Open index.html and add this:
<!DOCTYPE html>
<html lang="en">
<head>
  <meta charset="UTF-8">
  <meta name="viewport" content="width=device-width, initial-scale=1.0">
  <title>Profile Card</title>
  <link rel="stylesheet" href="style.css">
</head>
<body>
  <div class="card">
    <h1 class="name">John Doe</h1>
    <p class="bio">Aspiring front-end developer. Learning HTML, CSS, and JavaScript one line at a time.</p>
    <button class="btn">Hide Bio</button>
  </div>
  <script src="script.js"></script>
</body>
</html>
Open index.html in your browser right now - before you do anything else. You’ll see a heading, a paragraph, and a button. Unstyled, plain, and functional. That’s the HTML layer doing exactly what it’s supposed to.
Step 2 - The CSS
Open style.css and add this:
* {
  margin: 0;
  padding: 0;
  box-sizing: border-box;
}

/* body tag styling */
body {
  display: flex;
  justify-content: center;
  align-items: center;
  min-height: 100vh;
  background-color: #1a1a2e;
  font-family: sans-serif;
}

.card {
  background-color: #16213e;
  border: 1px solid #0f3460;
  border-radius: 12px;
  padding: 2rem;
  max-width: 400px;
  text-align: center;
  color: #e0e0e0;
}

.name {
  font-size: 1.8rem;
  margin-bottom: 1rem;
  color: #e94560;
}

.bio {
  font-size: 1rem;
  line-height: 1.6;
  margin-bottom: 1.5rem;
  color: #a0a0b0;
}

.btn {
  background-color: #e94560;
  color: white;
  border: none;
  padding: 0.6rem 1.4rem;
  border-radius: 6px;
  font-size: 0.95rem;
  cursor: pointer;
}

.btn:hover {
  background-color: #c73652;
}
Refresh your browser. Same structure - completely different page. That’s CSS. Notice you didn’t touch the HTML at all.
Step 3 - The JavaScript
Open script.js and add this:
const bio = document.querySelector('.bio');
const btn = document.querySelector('.btn');

btn.addEventListener('click', function() {
  if (bio.style.display === 'none') {
    bio.style.display = 'block';
    btn.textContent = 'Hide Bio';
  } else {
    bio.style.display = 'none';
    btn.textContent = 'Show Bio';
  }
});
Refresh and click the button. The bio hides. Click again - it comes back. The button label updates to match.
That’s JavaScript responding to a user action in real time, without the page ever refreshing. The structure (HTML) and appearance (CSS) stayed exactly the same - only the behaviour changed.
You’ve just built a working, three-layer front-end project from scratch. It’s small, but the structure is identical to how production front-ends are built. Scale it up, add more components, connect it to data - and that’s the job.
The Full Roadmap
Here’s what the path from beginner to confident front-end developer looks like in 2026. The stages are sequential - each one builds on the last, and skipping ahead tends to backfire.
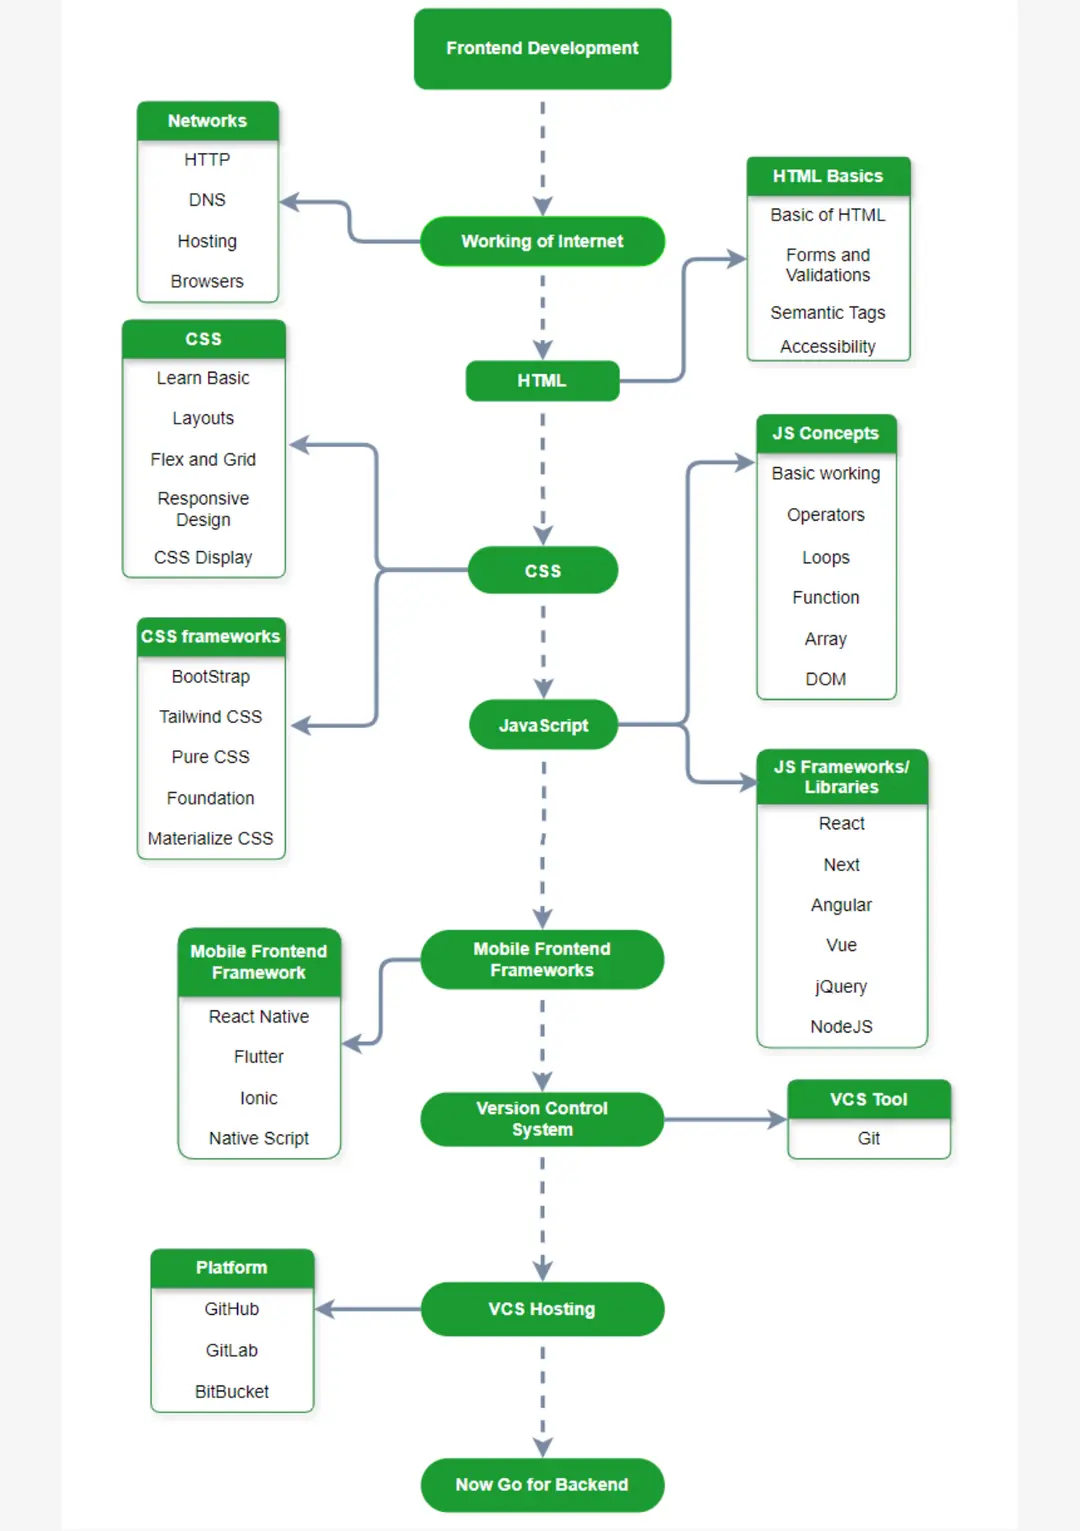
Stage 1 - HTML (2–4 weeks)
Learn the common tags, understand document structure, and start thinking in semantic HTML - using the right element for the right job. A <nav> for navigation, an <article> for a blog post, a <footer> for the bottom of a page. Not everything in <div>s. Semantic HTML matters for accessibility and for how search engines read your pages.
Also learn forms - inputs, labels, buttons, dropdowns, and how they behave - because forms are everywhere and they’re one of the first things you’ll be asked to build.
You’re ready to move on when: You can build a multi-page site from scratch - a home page, an about page, a contact form - without looking anything up.
Stage 2 - CSS (4–8 weeks)
This stage takes longer than most beginners expect and that’s completely normal. Start with the box model - every element on a page is a box with content, padding, a border, and a margin, and understanding this unlocks most layout problems.
Then move into layouts: Flexbox for aligning and distributing elements in one direction (a row or a column), and CSS Grid for more complex two-dimensional layouts. These two tools handle the vast majority of real-world layout work.
Then responsiveness - media queries, fluid units (%, rem, vw), and making your layouts adapt cleanly to phones, tablets, and desktops. A front-end that only works on one screen size isn’t finished.
You’re ready to move on when: You can look at a webpage design - something you’ve seen on the internet - and rebuild it in CSS without the layout falling apart. Pixel-perfect isn’t the goal at this stage. Being in control of what goes where is.
Stage 3 - JavaScript (8–12 weeks)
The longest stage and the most important one. This is where front-end development becomes real programming.
Start with the fundamentals: variables, data types, conditionals, loops, and functions. These are the building blocks of every program you’ll ever write. Then move into the DOM (Document Object Model) - how JavaScript sees and interacts with the HTML elements on a page. Then events - handling clicks, inputs, form submissions, key presses.
After that, asynchronous JavaScript: fetch, promises, and async/await. This is how front-end code talks to back-end services - requesting data, waiting for the response, and doing something with it when it arrives. It’s also where most beginners struggle, and pushing through this part is one of the more important milestones on the path.
You’re ready to move on when: You can build an app that fetches data from a public API - a weather app, a movie search, a GitHub profile viewer - and displays it on the page. Without following a tutorial.
Stage 4 - A Framework (8–12 weeks)
Once you’re solid with JavaScript, frameworks make building complex interfaces dramatically faster and more maintainable. The three main ones you’ll encounter:
- React - built by Meta, the most widely used framework in industry, the most job listings, the largest ecosystem of libraries and tooling. This is where to focus.
- Vue.js - lighter than React, often described as more approachable. Worth knowing about; some teams and companies prefer it, particularly in certain regions and industries.
- Angular - built by Google, popular in enterprise settings. More opinionated, steeper learning curve, and not where most beginners should start.
Recommendation: start with React. Not because it wins every technical argument, even if it actually does, but because the job market is a real thing. Learning React maximises your options when you’re ready to work.
You’re ready to move on when: You can build a multi-component React app, manage state with hooks, and fetch and display data from an API - all without reaching for a tutorial.
Stage 5 - Tooling (Ongoing)
These aren’t a box you check - they’re things you pick up progressively and get more comfortable with as you build more:
- Git & GitHub - version control, non-negotiable. If you’ve been through the Linux post or the Bash post, you’ve already started here.
- npm - the package manager for JavaScript. You’ll use it constantly once you’re working with React.
- Vite - the modern build tool for front-end projects. Fast, simple, and what most new projects use today.
- Browser DevTools - the developer tools built into Chrome and Firefox, Brave and any other browsers out there. Learn to inspect elements, debug JavaScript, and check what’s happening with network requests. You’ll use this every single day.
- VS Code - the standard editor for front-end work. Extensions like Prettier (auto-formatting), ESLint (error checking), and the React snippets pack make the workflow noticeably smoother.
- TypeScript - JavaScript with static types. Increasingly expected on professional teams rather than just a nice-to-have. Pick this up after you’re genuinely comfortable with JavaScript.
Resources Worth Your Time
Curated - not exhaustive. One or two per stage, chosen because they’re actually good.
HTML & CSS
- MDN Web Docs - the definitive reference for everything HTML, CSS, and JavaScript. Not a tutorial, but the most accurate documentation that exists. Bookmark it now and use it every day.
- The Odin Project - a free, project-based curriculum that takes you through the full front-end stack. The HTML and CSS sections are particularly strong, and the project-first approach means you’re building things from day one.
JavaScript
- javascript.info - the best free JavaScript resource available. Covers everything from variables to advanced asynchronous patterns, clearly written, with exercises throughout.
- freeCodeCamp’s JavaScript curriculum - interactive and free. Good for building fundamentals with immediate feedback on every exercise.
React
- The official React docs - the docs were completely rewritten in 2023 and are genuinely excellent now. Start here rather than third-party tutorials.
- Scrimba’s React course - interactive video lessons where you code directly in the browser. Particularly good if you learn better by doing alongside watching.
Practice Projects
- Frontend Mentor - real design mock-ups you build from scratch, at varying difficulty levels. This is how you close the gap between “I understand the concepts” and “I can actually build things.” The single most useful practice resource for front-end developers at any level.
Frequently Asked Questions
Following this roadmap with consistent daily practice, most people reach a job-ready level in 9 to 18 months. That range is wide because the pace of learning matters far more than the total time. Two focused hours every day will get you there faster than eight scattered hours on weekends. The material itself isn't insurmountable - showing up consistently is the harder part.
HTML and CSS are genuinely accessible - most people pick up the basics quickly and start seeing results fast. JavaScript is where the difficulty spikes, and it's where a lot of self-taught developers stall. The key is to not move on until you understand what you're doing. Copying code you don't fully understand builds habits without foundations, and it catches up with you.
No. Front-end development is one of the most portfolio-driven disciplines in tech. What matters is what you can build and show. A well-documented GitHub profile and a portfolio of real projects will open more doors than most degrees will - especially in a market where self-taught developers are increasingly common and respected.
Front-end. The feedback loop is immediate and visual - you write code, you see the result on screen. That immediacy makes the early learning process significantly more engaging and easier to sustain. Back-end is more abstract; if you're undecided, start here and see how it feels.
A UI/UX designer decides what an interface should look like and how it should work - they focus on the user experience and produce designs, typically in tools like Figma. A front-end developer builds those designs in code. The two roles overlap - good front-end developers absolutely think about user experience - but they're distinct skills. Some people do both, and those people tend to be very employable.
Where to Go From Here
You’ve got the full picture now: what front-end development is, how HTML, CSS, and JavaScript work together, a working webpage you built yourself, a complete roadmap from zero to React, and the resources to execute on each stage.
The next step is to start - and to start small. Open a text editor, write your first HTML file, and build something. A personal page, a fake product landing page, a to-do list. The concept doesn’t matter. Getting something running and seeing it in the browser is what matters.
If you’re not fully set up on Linux yet, the Windows to Linux guide covers everything from dual boot to a working developer environment. And if the terminal still feels unfamiliar, the Bash scripting post is worth a look - front-end developers use the terminal far more than most beginners expect.
For questions, project feedback, or just showing off something you built - the community links are in the footer.